Hello my Blogger friends. Well my nerve pain is too bad to even craft today...you KNOW that it is bad when I don't even feel like crafting...LOL. Please understand, I am not asking for sympathy, it is just my reality.
I have however been blog surfing and found a couple of cool things to share. (Thanks to my computer whiz son who has hooked the pc to the tv. I have been using the tv as a monitor and have a wireless mouse and keyboard. This way I can lay back in my recliner and still visit blogland. I have been doing this for over a year now and am just so grateful that I thought I would mention it:)
My sweet Bloggy friend, Gail from Gail's Card Cafe, has made an adorable water melon shaped card from my file. Hop over here to check it out. http://nitrogail.blogspot.com/2011/06/watermelon.html
My other Bloggy friend, Tracey, from Garden of Grace has some great technique tips at this post: http://gracescraps.blogspot.com/2011/06/three-time-ukc-championsperfect-summer.html
The creative, smart ladies over at Lily Pad Cards posted a helpful tip on the long list of amazing uses of coffee filters. As a former elementary school teacher, I thought I knew a lot of uses for them. (You use whatever is cheap as a teacher) These ladies listed off several that I have never even thought of. Check it out for yourself here : http://www.lilypad.inlinkz.com/2011/06/28/the-frugal-crafters-coffee-break/
Hope you enjoy these sites as much as I do :)
Tuesday, June 28, 2011
Monday, June 27, 2011
One and only
Hello Blogger friends. I have been so busy playing with my cute "ants" and "beach" files that I almost forgot about the City Crafter Blog Challenge this week.
Oh well, it was time to make something pretty anyway :)

The challenge is to use the number one.
(although I guess that was a little obvious...LOL)
I decided to make this "1" shaped card. The tag reads "and only" (for one and only).
It is hard to read in the picture.
I made the cut file and templates for the "1" card. It could be used for a 1st birthday, 1st step,etc.)
I cut the butterfly from a cut file I bought from Lettering Delights. Then ran it through my Xyron and added clear micro-marbles. (I know I use those a lot, but they make things look soo pretty)
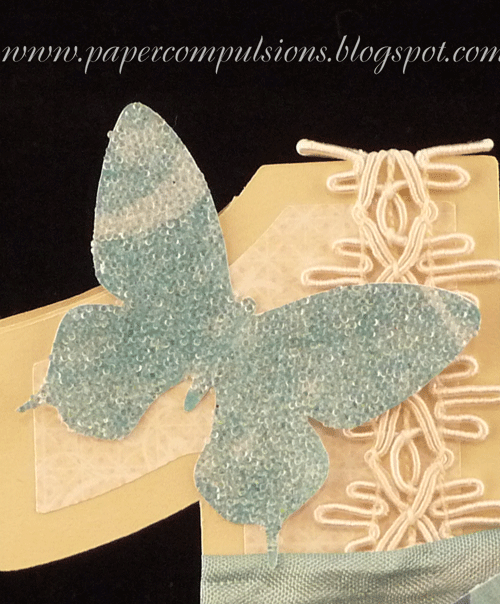
I wanted to use the seam binding that I dyed in Stream Alcohol ink and rubbing alcohol, so I chose a neutral background. I added some trim I got from Joann's and a hat pin I dyed with Stream.

I finished it off with some patterned paper that I pleated and a line of pearl trim.
Hope you enjoyed it.
Here is the link to the svg cut files and pdf template for the
I have made lots of cool beach item shaped cards and finally finished the birdhouse files.
Will share those soon.
Sunday, June 26, 2011
Fun in the Sun

Just thought I would share my latest creation. It is a step card with a beach theme.
I got the idea for the sun from the July/Aug. 2011 Paper Crafts Magazine.
Julie Campbell designed a flower using curled up squares and a button in the center.
I decided it would work great for a sun.
She used double sided paper and the patterned paper I wanted to use was just one sided so I adhered it back to back.
Here is how it works:
Take 1 1/4 inch squares of paper.
Curl to edges over and glue flaps in place.
Arrange the curled pieces in a circle and glue down like this

(Note: I made part of the sun hanging off the side and trimmed the excess. The original was a full circle.)
Next, place a circle on top.
(I used paper, Julie used a button, but any round shape would work)

For right now, I will just show you the rest of the card...

sandcastle, shell, & starfish
(If you look really closely, you can see that I tried to emboss the starfish with my Cuddlebug swiss dots embossing folder. Good idea, but the piece is so little that it only ends up with 3 or 4 dots...LOL)

pail, shovel, & shell
I am thinking now that the shovel is way too big for the pail...oh well...

seagulls
I live near Galveston so the seagulls were a MUST...although the water in our area of the Gulf of Mexico is never blue but brown:)

umbrella and beach ball

...and the water.
(shark included :)
I put a black background behind the card when I took pictures so it is hard to see, but I have "Fun in the Sun" on the different parts of the steps.

I have to go tweek a few things but I thought it turned out pretty cute.
Hope you enjoy it!
Happy crafting!
Friday, June 24, 2011
Summer Blog Hop Day 1

You should have arrived here from Janet's Blog (http://ladyluvbug.blogspot.com/)
if so you are on the right path, if not please click on the link http://scrapersdelight.blogspot.com/ to start at the beginning as we'd hate you to miss out any letters.
Here is the line-up just in case you missed a blog.
Martina Brill http://stampinggoddess-stampalicious.blogspot.com/
Meesh AKA Michelle http://meeshskraftkorner.blogspot.com/
Rhonda Miller http://bluepoohbear753.blogspot.com/
Ginger Williams http://memories-by-gn.blogspot.com/
Giselle Varela http://crossmyheartpapercrafts.blogspot.com/
Danielle http://daniecreatief.blogspot.com/
Janell http://janellscreations.blogspot.com/
Trisha http://trishliciousandco.blogspot.com/
Leslie Krochta http://www.lesliekcreations.blogspot.com/
Carol http://www.butterflycardsbycaz.blogspot.com/
Tracy http://queeniesscrapmad.blogspot.com/
Brandy http://allthingscrafty-brandy.blogspot.com/
Amber http://pixiperfectcreations.blogspot.com/
Janet http://ladyluvbug.blogspot.com/
Jani Lewis http://papercompulsions.blogspot.com/
Carrie http://paperglitterstamps.blogspot.com/
Freda Thomas http://scraparama.blogspot.com/
I hope you are inspired by my project and are enjoying the blog hop so far!
When you are ready please hop over to
Carrie's blog at http://paperglitterstamps.blogspot.com/ and continue the fun.
When I think about summer, I think of picnics.
It seems like no matter were we go during the summer,
the zoo, the park, or camping,
we are always taking a break during the day to have a meal or even a snack.
And were you have food...
... the ants are sure to come!


Aren't these little guys cute! I just love the little ant with the watermelon :)


I made the cut files, cut them, and inked the edges, (it comes together really quick)
Then I added some red & white checkered patterned paper and grass.
(You can get the cut files if you are ...or become... a follower of my blog.)
The grass would not cut at exactly 12 inches so I made one long srtip and one short piece that join together.
I added my "loopy tags" and some stictched ribbon and I was done.
I also made this little card.

The cut file comes with the holes for the stitching included. I used red embroidery thread. It does not take but a few minutes to stitch up.
Here are the svg cut files and pdf templates for the ant card.
If you want the whole set of ants and picnic items just:
1) be or become a follower of my blog.
2) leave a comment here with your blog address
or
email me at papercompulsions@gmail.com
I will email you a compressed folder with the svg cut files and pdf templates.
Be sure and check back each day this week to see what fun things I have posted.
I hope you will continue the fun at the other blogs on the list.
(only 2 more to go then back to to submit your answers to the questions)
My hint to you before you go is that one of the words is a day of the week.
Here is my letter

Your next stop:
Paper Dolls Challenge Week #4 Flip Flops
What a fun challenge this week over at the Paper Dolls Blog! It is challenge #4 and the theme is Flip Flops!
Eleanor of SVG Shop has provided these really fun flip flop boxes.

Aren't these adorable!
I added felt ribbon instead of the paper pieces for the foot.

Then I added some ribbon with beaded trim to the edge of the box lid.

This was so much fun you have to try it out for yourself :)
Head on over to the Paper Dolls Blog in join in on the fun.
You'll FLIP over it!
(sorry, I could not resist :)
Wednesday, June 22, 2011
Bird on branch
I have been working on more masculine projects the past few weeks and I missed my paper flowers. So I made this card just because it was on my mind.


This is the same bird I used on the atc and gave out the cut files for.
I did not make the bird cut files from stratch, I copied them, but the branch, flowers, and scalloped tag are mine. I have made these flowers a lot. I use what I call my tattered flowers file to cut 2 large flowers and 2 smaller flowers. Then I ink them, curl the petals down for the large flowers and up for the smaller flowers. I stack them while rotating the petals to stagger them. Last, I add seed beads to the center.
I stamped the bird with a Stampin Up stamp from the Barouque Motifs set and embossed it with pearl embossing powder.
If you have been following my blog for a while, you probably already have the flowers and the bird.
I should mention that I put my initials, JL, at the end of most of my files. That helps me to remember that I made the file and am free to use it as I choose. It will also help you to identify who made the file or where you got it from. Sometimes I forget to add my intials, but most of the time they are there.
Please remember to credit the person who made the file when you use it to make something for an online post or challenge.
Storage for Distress Ink Foam Pads
I am sure that someone else has thought of this, but I have not seen it yet. It just occurred to me yesterday when I was wrestling with all the little foam applicators for my TH Distress Inks.
VELCRO!
Instead of having all the little foam pads get tossed around in my box of ink, I decided to put Velcro hook tape on the sides of the box and it organizes it perfectly.


It is the peel and stick Velcro so it was super easy and it keeps me from having to search for the right color pad or having to move them out of my way every time I get something out of the box.
I put them in a box, but this idea would be great for a wall or the inside of a drawer or cabinet door.
Just wanted to share the news with you.
Hope it helps someone else :)
Tuesday, June 21, 2011
Paper Crafting Wolrd Digi Challenge #8
If you have followed my blog for a while you have heard me say that I am not a very good stamper. I enjoy it but I just can't seem to get images to be clean and crisp or to color them and have them look the way I want them to. I can manipulat and cut paper all day, but ask me to stamp and I struggle with it. I believe in trying new things until I get it right or find a technique that works for me.
I may have found it!
Distress inks.

I have been watching videos at Lily Pad Cards where she uses Distress inks to blend the background then stamps over it or uses a resist technique then inks over it.
Since the challenge this week at Paper Crafting World is to use Red, Orange, and Yellow",
I thought this was the perfect time to try this technique.
I really like it. I know it is not perfect. (I tried to hide most of the mistakes, but believe me, they are there. This is the closest I have come to getting a look that I like when using stamps.
I used:
Tim Holtz Distress Inks; Barn Red, Rusty Hinge, & Wild Honey
Colorbox black pigment ink
Inkadinkadoo script stamp
Hot Off The Press labels stamps & borders stamps
The roses are one of Melin's digital stamps called "Roses In Vase".
You can purchase it here.
Obviously, I cut out the vase. I also printed it twice because I needed to hide the area that I messed up on with the script stamp :)
Head over to Paper Crafting World and join in the fun of the digi stamp challenge this week.
Monday, June 20, 2011
ATC for City Crafter Challenge
This week at City Crafter Challenge Blog, they are having an Artist Trading Card (ATC) challenge. ATCs are small 2 1/2 by 3 1/2 cards that artists/crafters share with each other as sample of their work. I wanted mine to reflect me so this is what I came up with:

I love blue and white as you can probably tell from my blog colors. My kitchen has blue and white dishes and deorations all over the walls. This basket is one of my favorites.

It sits on the counter. (obviously it does not hang from the wall :)
The dishes that we use are blue and white too.

I LOVE them! The colors I like and flowers :)
So you can see why I chose the colors. There is also a "J" on the card for Jani. It is hard to see in the picture because I have so much stuff going on with this little card.

Of coarse it would not be complete if it did not have flowers so I added 3 tiny little flowers and put rhinestones in the center.

There is one piece of solid colored blue paper on the card. Everything else started as white cardstock and I inked them (TH Distress Ink: Wild Honey & Chipped Saphire)
For the blue and white embossed piece, I put Distress ink on my embossing folder then embossed it with Cuttlebug's Victoria embossing folder.
Here are the cut files for the bird, small leaves, and tiny flowers. I copied these birds from a picture so I can't really say that I created this file.
Hope you enjoy and head over to City Crafter Challenge Blog (where I am entering this ATC) to see all their lovely creations. It is full of inspritation.
Sunday, June 19, 2011
Paper Dolls Challenge week 3
Well the Paper Dolls are having another cut file challenge. I missed the challenge last week, but the dollhouses they made were so cute I just might have to make one just for the fun of it.
This week they have a challenge designed around cut files inspired by the graphics they used on their blog. Belinda (aka Bee) from Bee's Hive O Drama made the svg's.

I used Belinda's frame and heart shaped button and made a shaker box card with a see-through window.
I added blue glitter to the shaker box to look like water.
(It reminds me of those plastic cases with sand in the middle where you can flip it over and watch the sand flow to the other side :)
On the inside I have a cute little duckie and some waves.

The inside pieces all started out as white cardstock and I used my wonderful TH Distress Inks to color them.
(wild honey, rusty hinge, stormy sky, & tumbled glass)
I do not have a black Distress ink so I placed a couple of drops of Slate alcohol ink on my non-stick mat and sprayed it twice with water. I added a drop of blending solution then rubbed the innertube piece all around in it. My fingers got a little messy but it worked :)
For the cloud effect, I placed a scalloped edge stencil over the paper and used my blending tool to smooth Stormy sky ink around the stencil and all over the paper. I moved the stencil a few times, creating a cloud appearance when I lifted the stencil.
I have had that stencil for several years... back when chalking was the cool new technique in scrapbooking :)
You could just cut 's solid tag and use it as a stencil.
I have used this little duck before.
![]()

I still can't remember where I got it. (If anyone knows who made it please let me know and I will gladly give her credit.) This little critter always makes me smile. The waves are from a free cut file from SVG Cuts. I trimmed them a little to fit my card.
If you would like more info on the shaker box with the see through window, I did a tutorial on it. Look for it on the tab just under the header at the top of my blog.
Hope it makes sense :)
Here are the cut files and template I made for the card base.
Card with window
You can get Belinda's files on the Paper Dolls Blog and enter the challenge.
Happy crafting!
Friday, June 17, 2011
Dad you are dynamite
I'm on a roll baby! I have had so much fun making these masculine cut files. (Although I do miss my paper flowers) I am going to start doing more "cute" projects along with my "pretty" stuff like my paper flowers.
Well, here is another project for a guy. I made this for Father's Day but it could really be for anytime.

I got the idea from a creative lady named Jean at Jean's Crafty Corner. You can view her project here. She credits Allie at Allie Makes for her inspiration. You can see Allie's project here. Well, now I have added my touch to their idea with cut files.

The "sticks" are paper rolled around Rollo's candies. I made some single sticks and also bound three sticks together with twine.
I also made a little crate to hold them.
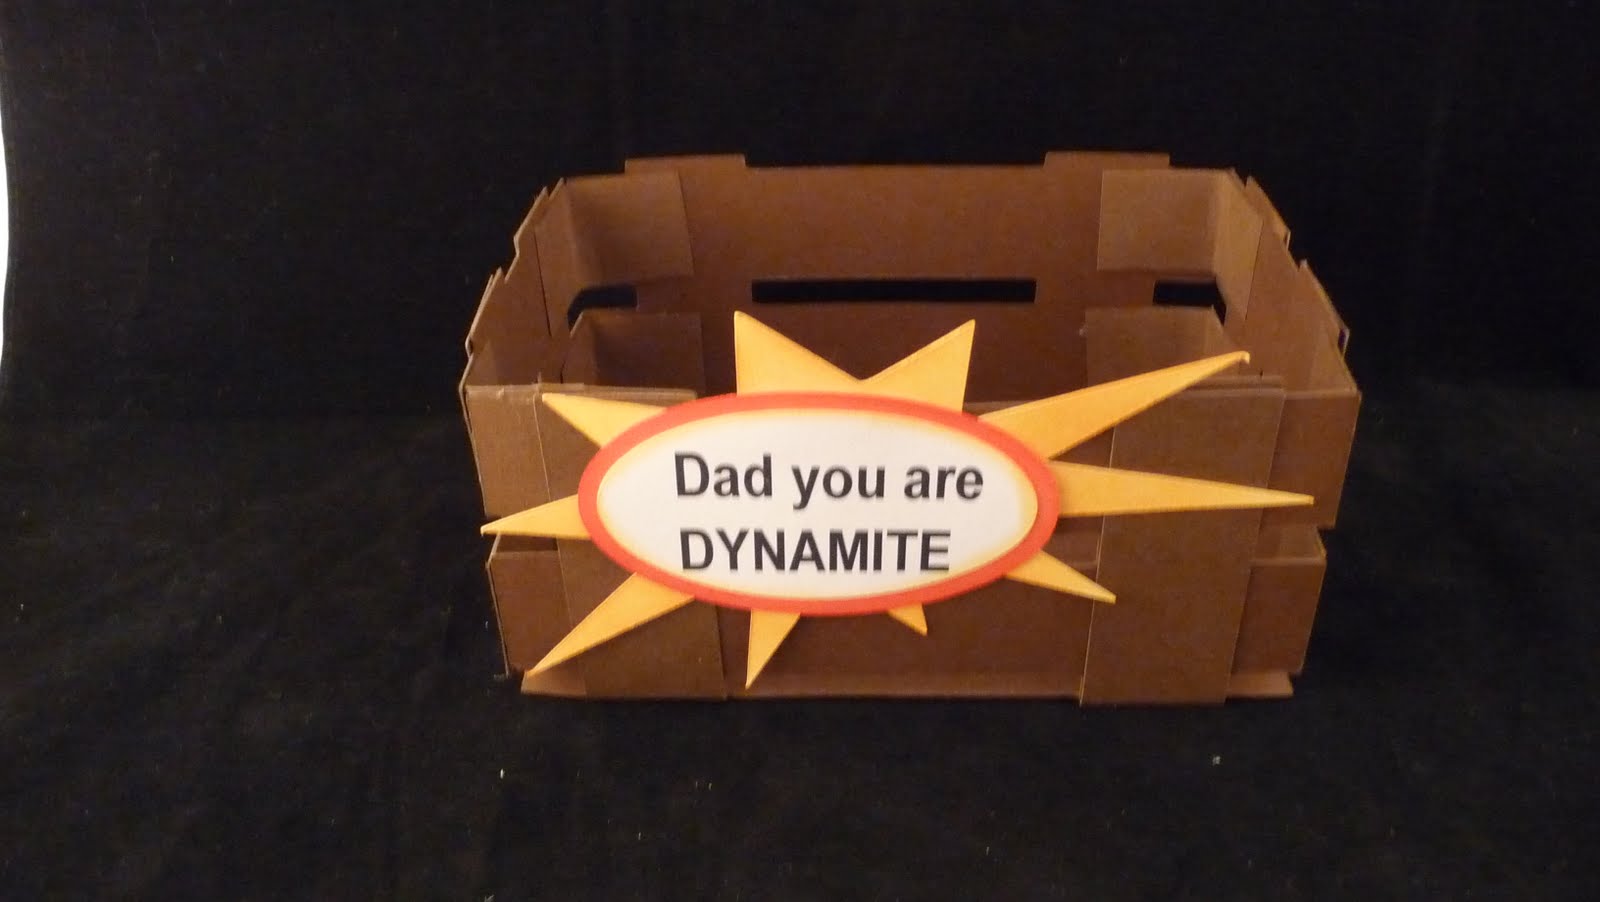

The starburst and ovals with the caption were all cut from white cardstock and inked. I used TH Distress Inks: Barn Red & Wild Honey.
I printed the caption in Inkscape and then used my die cutting machine to cut it out.
I also added a card inspired from Jean's project.

It is a long shaped card. I inked it with Barn Red and Frayed Burlap. I added some holographic glitter to the little starburst. (front & back since you see the back of it when you open the card.)

I always line the inside of my cards to make them sturdier and give them a more finished appearance.
It will fit in a letter sized envelope.
(Handy Hint: place the card on top of the envelope before you attach the wick and starburst pieces to make sure you don't get them hanging off the edge and unable to fit in the envelope)
(Guess how I learned that???)

Well here is the link to the free svg cut files and pdf templates. Most of the steps are pretty obvious but I put some simple instructions in one of the pdf's.
Be sure and check out Jean's and Allie's posts too. Everyone does things a little differently and you may like the way they did this idea better.
Hope you enjoy them!
Wednesday, June 15, 2011
Toolbelt card and jeans pocket card

How Stinkin' cute is this!
It is a toolbelt card with tools and the belt buckle actually works so the belt can be opened and closed.


The belt can go in the front or in the back.


I used tan colored cardstock and TH Distress ink (Antique Linen & Frayed Burlap) to make the paper look like real leather. I added stitches with white embroidery floss.
(mu first draft of this card just had white stitchmarks from a pen but the embroidery floss looks much better IMO)
Then I added miny brads to the corners of the pockets to replecate the grommets in a real tool belt.
I considered using eyelets but did not want to go dig through my stash to find them...LOL.
I went back and added stitchmarks to the cut file. It took FOREVER to get them just right. (which is why I did not post for a week and missed out on all the fun challenges this past week :(
All in all, I have to admitt it was worth the effort.

And what is a tool belt without tools...

I even added an accessory loop on the side for the hammer!
(My dear husband gets credit for that idea)

If you look really close, you can see all the little bity holes I added to the handle of the hammer!
I am not sure whether or not that is hard on the digital cutter, but how cute is that!
Can you tell I am excited about this project? Actually some of that excitement is just from FINALLY being through with it :)
Oh, and underneath all that cutness is a card...LOL...I almost forgot about that part :)

Oh, yeah! That is what this project started out as...a card...ha-ha

I ended up making several of these so I put one up in my new Etsy store. I also put the svg files and pdf templates for the card on Etsy. You can see them here.
But don't worry, I am not sending you home empty handed...
After making the pockets for the toolbelt card, I started thinking how cute a pocket on jeans would look.

Sooo cute!
Of coarse, I had to make something to go into the pocket...


A key chain for dad. (actually you could put anything on this key chain so the possibilites are endless.)
I twisted the edges of the middle layer of the keychain to make it look more realistic.
I cut a slit in the round part of the ring so the key would fit onto it, then covered up the slit with the tab on the keychain.


I just happened to have some denium patterned paper that I stashed away several years ago.
(I confess to hoarding paper)
I also had a little bit of bandana material left over from a project I did a few years ago.
(ok, I hoard all kinds of craft stuff, but how else would I be able to make this cute little card???)

This pocket would be great for cash or gift cards. I can just picture a sling shot and a toy rubber snake hanging out of the pocket too. (OH, I should have added a little red tab on the side of the pocket!)
I forgot to mention the wrench in the card was from my toolbelt card. I included it in the pocket card acessories.
Here is the link for the free cut files and PDF's .
Thanks for hanging in there for this really long post and for sharing in my excitement over these two cards.
Happy Crafting!
I am entering these cards in :
the Stampin' Sisters In Christ Challenge : Father's Day or Praising our heavenly Father.
Scripture: Ephesians 6:2-4 (NRSV) "Honor your father and mother"--this is the first commandment with a promise: {3} "so that it may be well with you and you may live long on the earth." {4} And, fathers, do not provoke your children to anger, but bring them up in the discipline and instruction of the Lord.
and the My Craft Spot Challenge : Project for Dad
Subscribe to:
Posts (Atom)