Tuesday, April 30, 2013

Pink and Gray Center Step Card

I started making a Mother's Day card. I carefully selected a beautiful Prima patterned paper, Cypress Rose from the Tea Thyme collection. Ironically, the paper was a 12 by 12 and by the time I got through cutting and embellishing, you can not see much of the paper. LOL

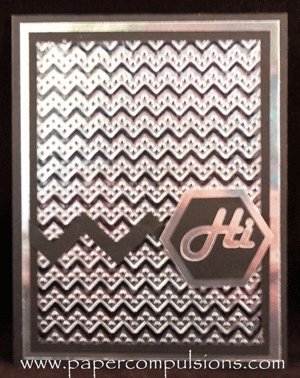
Here is the card though.

Yes, I know I have made several cards that are this same style, but when the papers and colors are different, they look different to me. Besides, I like the style. LOL

Believe it or not, besides the top layer of patterned paper, all the other papers started as white cardstock and were colored with TH Distress Inks. I inked the card base with Black Soot then stamped over it with a script background stamp in Pumice Stone. Next I used Victorian Velvet with a little Worn Lipstick for the mat.The handmade Regal roses were made from white cardstock that was inked with those same 2 pink colors. The leaves were inked with Shabby Shutters, Peeled Paint, and Forest Moss.


You can see a little portion of some Recollections bling and a bow made from white seam binding and Worn Lipstick Distress Stain.

Here is a shot of the back so you can see a little of that beautiful Prima paper I started with.

I did put a lot of extra details in this card that may not be very noticeable. Then again it is a Mother's Day card so a little extra love should go into making it. :)

Friday, April 19, 2013

Colored Candles

You might remember that we moved into a different house last Fall. In getting the house ready, I realised the white candles along the fireplace needed some color. I got my trusty alcohol inks out and got to work on the candles.


Here is a short 4 minute video explaining how I colored them.


My candles were old and have battle scars where our cats have knocked them over on several different occasions, but with a little ink, they look pretty good. (at least from a distance...LOL)

Thursday, April 11, 2013

Bevy of Butterflies on Wall

I have noticed several Pinterest pins with butterflies grouped in a heart shape. I thought this would be perfect for the wall behind my chair.


I gathered several sheets of patterned paper from an old K & Co. stack and a few from a new Recollections pack called Love Letters. (new favorite because of all the glitter)

My Lynx got to work cutting several different sizes of a simple butterfly pattern. Then I added Aleene's Tack It Over and Over glue to the back of each one and let it dry. This allowed me to re-position the little beauties over and over again until I got a heart shape that I was happy with.


My hubby saw it when it was still in progress and suggested I leave a few of the butterflies on one side to look like they were flying off.

I can not decide which one I like best. So please tell me...

Are you team symmetry?                                                             Or team asymmetry?


Just leave a comment to the post.
I am eager to know your opinions! :)


I also cut some butterflies from this checkered glitter paper. They are very pretty but just did not fit with the other patterns. I grouped them off in another area like this.

It is a very easy concept and I think it looks really nice.

Don't forget to leave a comment and let me know which heart shape you like the best.
Thanks!


Saturday, April 6, 2013

Faux Resist on Foil Paper

I have shown many cards that I have made using this Faux Resist on foil paper. 


I made a video showing how it is done. I have never heard of anyone else doing this particular technique. I would appreciate a mention if you share the info on a video or blog post. THANKS!


Thursday, April 4, 2013

Inking on raised embossing

Hello all. I made a couple of really quick videos showing how I ink on the embossed area of cards, It makes a really cool background.


Here is the short video showing how to ink on embossed metal or foil paper.
(less than 4 minutes)


Just in case anyone wanted to know how I ink on these embossed areas, here is a quick tutorial. (less than 8 minutes)


You can download the Chevron and Hexagon cut files that I used here.


Tomorrow I will have a video showing how to remove ink like I did for this card.


Tuesday, April 2, 2013

Trendy Embossing


I bought the M-Bossibilities  "So Trendy". This Spellbinder's embossing folder has 2 sides so you can get 2 different embossed patterns from it, hexagon or chevron. (genius!)

I think it makes such wonderfully embossed panels that can stand alone without much embellishment. Perfect for masculine cards.

For the cards pictured above, used foil paper and inked over it. (I'll have to show that in a video soon)

The raised images the folder makes looks great on both sides.

Here you can see where I inked the side with the raised chevrons in Peacock Feathers and the side with the de-bossed chevrons in Seedless Preserves.